在自定义功能中应用系统内置控件与图标
前面我们已经了解到Access
2016的功能区是可以整体或部分隐藏的,同时系统内置的功能区中的组也是可以重新组织的,我们只是不能修改系统内置控件的属性。那在应用程序开发中我们应如何利用系统内置的控件呢?最简单的方法就是在我们自定义的功能区的选项卡中直接引用它们,下面我们就来学习如何在我们自己定义的功能区上使用系统内置的控件与图标。
一、创建一个只包含自定义元素且无图标的功能区
现在我们按前面掌握的方法创建一个完全由用户自定义的控件组成一功能区,相关控件没有指定图标,同时我们隐藏系统内置的功能区,如图6-1所示的样子:
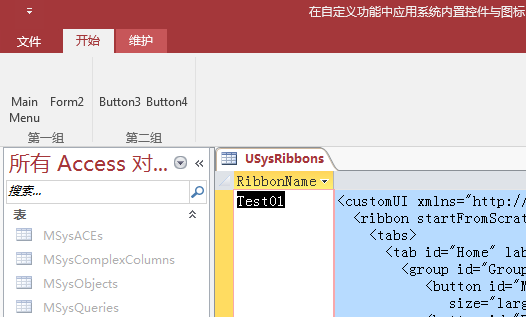
图6-1 自定义的用户功能区
实现这个自定义功能区的相应XML代码如下所示:
<customUI
xmlns="http://schemas.microsoft.com/office/2009/07/customui">
<ribbon startFromScratch="true">
<tabs>
<tab id="Home" label="开始">
<group id="Group1" label="第一组">
<button id="MainMenu" label="Main Menu"
size="large"
supertip="Open the Main Menu"/>
<button id="Form2" label="Form2"
size="large"
supertip="Open form 2"/>
</group>
<group id="Group2" label="第二组">
<button id="Button3" label="Button3"
size="large"
supertip="Open the Main Menu"/>
<button id="Button4" label="Button4"
size="large"
supertip="Open form 2"/>
</group>
</tab>
<tab id="Maintenance" label="维护">
<group id="GroupM1" label="Group M1">
<button id="Button21" label="Button 21"
size="normal"
supertip="Small button 21"/>
<button id="Button22" label="Button 22"
size="normal"
supertip="Small button 22"/>
<button id="Button23" label="Button 23"
size="normal"
supertip="Small button 23"/>
</group>
<group id="GroupM2" label="Group M2">
<button
id="Button24" label="Button 24"
size="normal"
supertip="Small button 24"/>
<button id="Button25" label="Button 25"
size="normal"
supertip="Small button 25"/>
<button id="Button26" label="Button 26"
size="normal"
supertip="Small button 26"/>
</group>
</tab>
</tabs>
</ribbon>
</customUI>
在这个例子中我们创建了两个选项卡:开始与维护。在第一个选项卡“开始”上,我们放置了两个组,每组中又放入了两个按钮,这个可以参考图6-1。在第二个选项卡“维护”之上,我们也放置了两个组,且每组中置入了三个按钮,如图6-2所示:
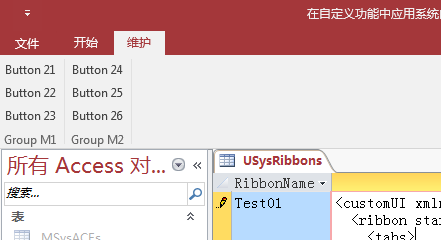
图6-2 自定义的“维护”选项卡
二、在自定义功能区中直接引用内置的图标与控件
下面我们来进一步修改我们的XML,从而改变自定义的功能区。我们把XML代码修改为如下的样子:
<customUI
xmlns="http://schemas.microsoft.com/office/2009/07/customui">
<ribbon startFromScratch="true">
<tabs>
<tab id="Home" label="开始">
<group id="Group1" label="第一组">
<button id="MainMenu" label="Main Menu"
imageMso="BlogHomePage"
size="large"
supertip="Open the Main Menu"/>
<button id="Form2" label="Formatted Text"
imageMso="FormatTextMore"
size="large" supertip="Open
the form for formatted text"/>
</group>
<group id="Group2" label="第二组">
<button id="Button3" label="Large Image"
imageMso="ControlsGallery"
size="large"
supertip="Open ?"/>
<button id="Button4" label="Small Image"
imageMso="ControlsPane"
size="large"
supertip="Small Image on a large button does not expand nicely"/>
</group>
<group idMso="GroupTextFormatting"/>
<group idMso="GroupRichText"/>
</tab>
<tab id="Maintenance"
label="维护">
<group id="GroupM1" label="Group M1">
<button id="Button21" label="Large Image"
imageMso="ControlProperties"
size="normal"
supertip="Large image on a small button shrinks nicely"/>
<button id="Button22"
label="Small Image" imageMso="ControlsPane"
size="normal"
supertip="Small image on on a small button okay too"/>
<button id="Button23" label="Button 23"
size="normal"
supertip="Small button 23"/>
</group>
<group id="Db" label="Database">
<button idMso="FileCompactAndRepairDatabase"
label="Compact and Repair" visible="true"
size="large"
supertip="Maintain the health of your database by compacting and repairing"/>
</group>
</tab>
</tabs>
</ribbon>
</customUI>
应用保存并关闭后再打开,功能区变成了图6-3与图6-4的样子,在用户自定义的功能区的选项卡上添加了对系统内置一些组及控件的引用,同时也为自定义的按钮指定了相应的内置图标,请看图6-3和图6-4。

图6-3 引用了内置控件与图标的自定义选项卡“开始”

图6-4 引用了内置图标及控件的“维护”选项卡
在“开始”选项卡中,我们为前两个自定义组中的按钮控件指定了系统内置的图标,指定的方式是通过控件的“imageMso”属性来实现,imageMso属性用来告诉系统引用的是系统内置的图标,这个属性等号后的字符串必须是正确的内置图标的标识符,否则系统会提示错误信息。接着又在选项卡上添加了对系统内置的两个组“文本格式”和“格式文本”的引用,用的中组的idMso属性,这里的idMso属性是告诉系统要加载系统内置的组。
在“维护”选项卡上,我们只为自定义组“Group
M1”中的第一、第二个按钮控件设置的系统图标,而第三个没有,以此对照。后面在自定义“Database”组中又引用了系统内置的按钮控件“文件压缩及修复”,其idMso为FileCompactAndRepairDatabase。
对于用户自己定义的命令按钮,要让它能完成一定的操作,我们就必须亲自为它们编写相应的VBA回调函数,而对于引用系统内置的控件,就不需要写什么代码了,可以直接调用系统内置的操作以完成任务。如我们直接用鼠标单击下“维护”选项卡上的“Compact and Repair”按钮,Access就会执行内置的操作“压缩数据库”,相应的反应就是把当前数据库关闭 - 压缩 – 打开。
归纳一下,引用系统内置的元素与控件要运用其属性idMso,引用系统内置的图标应使用属性imageMso。对于系统内置的控件的引用,我们不必要编写相应的回调函数,可以直接调用系统内置的操作。
三、在自定义功能区中运用RibbonX对象操作功能区中的控件
大家知道功能区是应用程序与用户的接口,是交互的介面,用户用功能区上的控件实现对数据库内对象的操作。这种操作有时候是单向的,但有时候却是双向的,即通过功能区上的命令实现了对数据库中对象的操作,而被操作的对象在完成相关操作时也反向影响功能区上的命令控件从而改变它的状态等,下面我们通过具体的例子来说明。
在我们的示例数据库中新建两个窗体,分别命名为“frmMainMenu”和“frmFormattedText”,如图6-5与图6-6所示。

图6-5 创建一个用于“MainMenu”打开的窗体
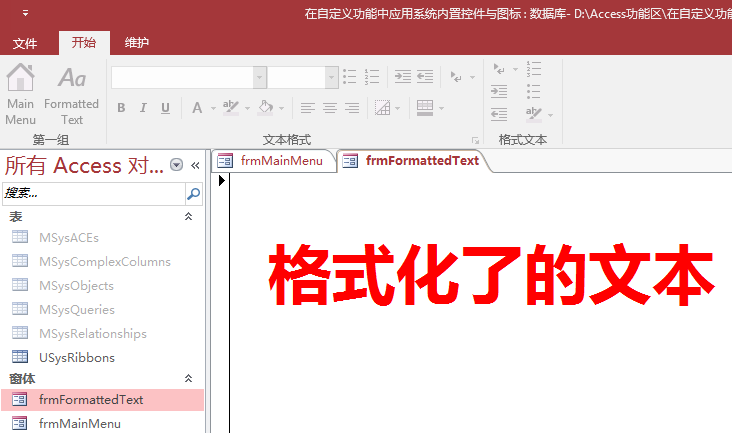
图6-6 创建用于“FormatedText”命令打开的窗体
数据库刚打开的时候,这两个我们创建的窗体是关闭的,我们想通过单击我们创建的“开始”选项卡上的“MainMenu”按钮打开“frmMainMenu”窗体,也就是我们写了“主菜单打开窗体”文字的窗体。再通过了单击“开始”选项卡上的“FormatedTest”命令按钮来打开“frmFormatedText”窗体,就是打开上面有“格式化了的文本”字样的窗体。
要实现我们上面说到的功能,我们先修改我们的XML代码,修改后的代码如下:
<customUI
xmlns="http://schemas.microsoft.com/office/2009/07/customui">
<ribbon startFromScratch="true">
<tabs>
<tab id="Home" label="开始">
<group id="Group1" label="第一组">
<button id="MainMenu" label="Main Menu"
imageMso="BlogHomePage"
tag="frmMainMenu"
size="large"
supertip="Open the Main Menu"/>
<button id="FormText" label="Formatted Text"
imageMso="FormatTextMore"
tag="frmFormattedText"
size="large"
supertip="Open the form for formatted text"/>
</group>
<group idMso="GroupTextFormatting"/>
<group idMso="GroupRichText"/>
</tab>
<tab id="Maintenance" label="维护">
<group id="GroupM1" label="Group M1">
<button id="Button21" label="Large Image"
imageMso="ControlProperties"
size="normal"
supertip="Large image on a small button shrinks nicely"/>
<button id="Button22" label="Small Image"
imageMso="ControlsPane"
size="normal"
supertip="Small image on on a small button okay too"/>
<button id="Button23" label="Button 23"
size="normal"
supertip="Small button 23"/>
</group>
<group id="Db" label="Database">
<button idMso="FileCompactAndRepairDatabase"
label="Compact and Repair" visible="true"
size="large"
supertip="Maintain the health of your database by compacting and
repairing"/>
</group>
</tab>
</tabs>
</ribbon>
</customUI>
保存所有修改并关闭示例数据库,然后打开测试修改的效果,这时我们会发现用鼠标去单击我们自定义的“开始”选项卡上“第一组”中的两个按钮时,Access系统没有什么反应。
为什么会是这样呢?请注意了,如果是引用的系统内置的控件,系统在内部已为之定义好了相应的命令操作,我们直接应用就能完成相应的任务。而我们自己定义的命令按钮,如果不事先为它指定编写好的回调函数,它就不能完成任何操作,不起任何作用。
下面我们再修改一下XML代码,修改后如下:
<customUI
xmlns="http://schemas.microsoft.com/office/2009/07/customui"
onLoad="OnRibbonLoad">
<ribbon startFromScratch="true">
<tabs>
<tab id="Home" label="开始">
<group id="Group1" label="第一组">
<button id="MainMenu" label="Main Menu"
imageMso="BlogHomePage"
tag="frmMainMenu"
onAction="ribOpenForm" getEnabled="ControlEnabled"
size="large"
supertip="Open the Main Menu"/>
<button id="FormText" label="Formatted Text"
imageMso="FormatTextMore"
tag="frmFormattedText"
onAction="ribOpenForm" getEnabled="ControlEnabled"
size="large"
supertip="Open the form for formatted text"/>
</group>
<group idMso="GroupTextFormatting"/>
<group idMso="GroupRichText"/>
</tab>
<tab id="Maintenance" label="维护">
<group id="GroupM1"
label="Group M1">
<button id="Button21" label="Large Image"
imageMso="ControlProperties"
size="normal"
supertip="Large image on a small button shrinks nicely"/>
<button id="Button22" label="Small Image"
imageMso="ControlsPane"
size="normal"
supertip="Small image on on a small button okay too"/>
<button id="Button23" label="Button 23"
size="normal"
supertip="Small button 23"/>
</group>
<group id="Db" label="Database">
<button idMso="FileCompactAndRepairDatabase"
label="Compact and Repair" visible="true"
size="large"
supertip="Maintain the health of your database by compacting and
repairing"/>
</group>
</tab>
</tabs>
</ribbon>
</customUI>
这次修改分别为两个定义按钮的标签添加了两个属性:一个是“onAction”,另一个是“getEnabled”。“onAction”属性设置的值为“ribOpenForm”,其实,“ribOpenForm”字符串是表示一个用于打开窗体的回调函数的名字,它告诉Access当用户用鼠标单击按钮时打开一个
的窗体。“getEnabled”属性用于初始化控件的状态,就是是否可用,这里的值为“ControlEnabled”,代表一个回调函数,这个将返回一个表示“true”或者“false”的参数来设置“getEnabled”属性。
接下来我们编写与这两个按钮相关联的回调函数,先按ALT+F11快捷键打开VBA编程环境,选择主菜单上的“插入/模块”,插入一个新标准模块,输入如下代码:
' 打开功能区控件的 tag 属性指定的窗体
Public Sub ribOpenForm(ByRef control As
IRibbonControl)
DoCmd.OpenForm (control.Tag)
End Sub
' 改变功能区控件的状态,确定它是否可用
Public Sub ControlEnabled(ByRef control As
IRibbonControl, ByRef enabled)
Select Case control.ID
Case "MainMenu"
If CurrentProject.AllForms("frmMainMenu").IsLoaded Then
enabled = False
Else
enabled = True
End If
Case "FormText"
If CurrentProject.AllForms("frmFormattedText").IsLoaded Then
enabled = False
Else
enabled = True
End If
End Select
End Sub
这里我们分别设计了前面提到的两个回调函数,第一是与“onAction”属性相关联的回调函数,它有一个“IRibbonControl”类型的参数,这个参数表示函数当前关联的控件。第二个函数是与“getEnabled”属性关联的回调,它有两个参数,一个是与“onAction”属性相关联的回调函数中具有的一样的“IRibbonControl”类型参数,另一个是“Variant”类型的通过指针引用(或地址引用)参数,它将向控件回传是否或真假值。
回调定义好后,我们保存模块代码,输入名称为“modRibbonCallbacks”,并关闭示例数据库,然后再次打开示例数据库。接下来我们测试效果,单击第一个“MainMenu”按钮打开了相应的窗口,如图6-7的效果:
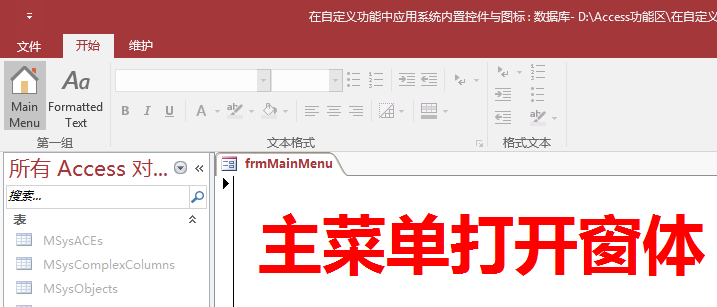
图6-7 单击“MainMenu”打开对应窗体
单击“FormatedText”按钮会打开指定的“frmFormatedText”窗体,如图6-8所示:
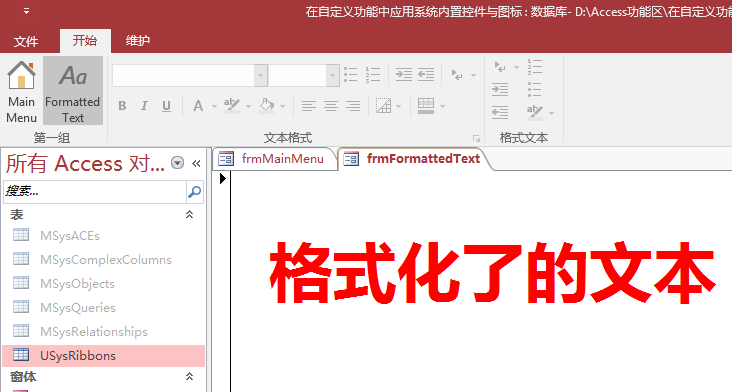
图6-8 单击“FormatedText”打开指定窗体
非常好,一切按照我们的设想在进行。再下来进一步完善我们的程序,以避免用户无意义的操作,如,窗体打开后,再单击按钮就没什么意义了,这时我们要想让用户明白,不能再单击此按钮了,就要禁用此按钮,把它变成不可用。当用户关闭窗口后,再将按钮恢复成可以使用的状态。实现这些功能,就需要在相关窗体的打开与关闭事件函数中引用系统功能区对象,通过功能对象操作其上的控件。
我们再打开前面生成的“modRibbonCallbacks”模块,在其中定义一个全局变量,用于保存功能区对象,其类型为“IRibbonUI”,代表功能区对象,此类功能区对象的处理是在Office对象库中定义的,因此我们一定要先引用“Microsoft Office 16.0 Object Library”,不然我们的回调函数都不能正常运行,如图6-9所示:
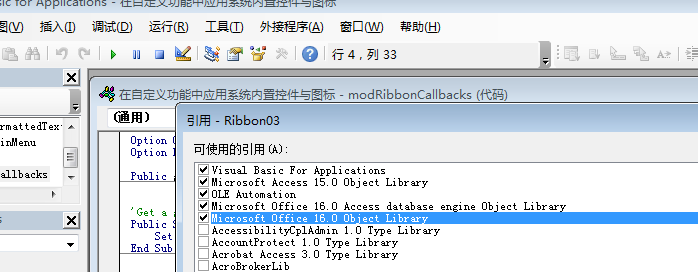
图6-9 引用Office对象
要保存功能区对象,我们需要在功能区加载时处理,我们为customUI标签增加一个onLoad属性,并为之定义一个相关联的回调函数,在这个回调函数里保存系统的功能的对象。VBA代码如下:
Public globalRibbon As IRibbonUI
' 当功能区加载时取得对全局功能区对象的引用
Public Sub onRibbonLoad(ByVal ribbon As
IRibbonUI)
Set globalRibbon = ribbon
End Sub
标准模块定义完成后的样子如图6-10所示:

图6-10 加入回调函数代码后的VBA模块
接下来我们来完成窗体打开与关闭事件的代码。在设计视图在打开“frmMainMenu”窗体,在“属性表”窗格中的窗体事件中双“加载”事件,在VBE中打开窗体事件的编辑窗口,输入如下代码:
Private Sub Form_Close()
If Not globalRibbon Is Nothing Then
globalRibbon.InvalidateControl ("MainMenu")
End If
End Sub
Private Sub Form_Load()
If Not globalRibbon Is Nothing Then
globalRibbon.InvalidateControl ("MainMenu")
End If
End Sub
同样,打开“frmFormattedText”窗体的事件代码窗口,输入如下代码:
Private Sub Form_Close()
If Not globalRibbon Is Nothing Then
globalRibbon.InvalidateControl
("FormText")
End If
End Sub
Private Sub Form_Load()
If Not globalRibbon Is Nothing Then
globalRibbon.InvalidateControl ("FormText")
End If
End Sub
完成后的两个窗体的事件代码窗中如图6-11所示:
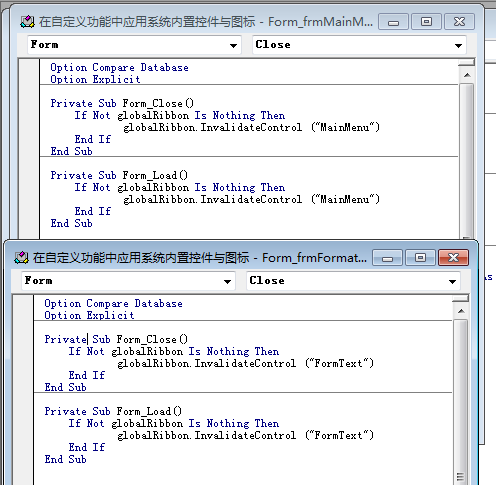
图6-11 加入了事件代码的VBA窗口
好了,保存所做的一切修改,关闭后重新打开示例数据库,欣赏一下我们自己的成果。打开窗体,按钮被禁用,如图6-12:
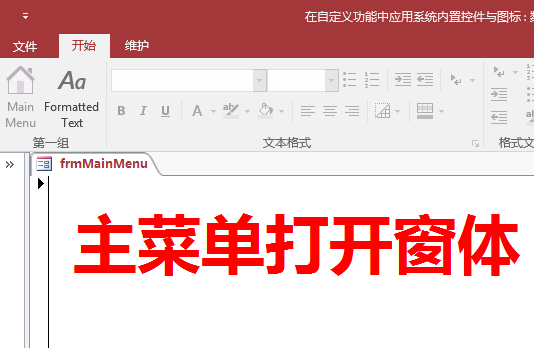
图6-12 窗体打开后禁用命令按钮
关闭窗体后,命令按钮恢复可用状态,如图6-13:
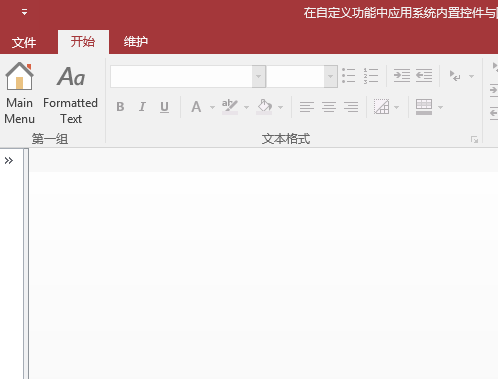
图6-13 关闭窗体命令按钮恢复可用状态
 点击下载此附件